OS Experiment in Rust (part 3): Graphics and the Framebuffer
UEFI provides a standard interface to the GPU hardware, which can set the video modes & allocate a framebuffer, to provide uniform (albeit rudimentary) baseline access to graphical output. Generally speaking, it’s a successor to VGA and VESA BIOS standards that were commonplace on older systems. UEFI calls this the Graphics Output Protocol. In this post, we’ll walk through the steps to add a simple framebuffer graphics interface to the UEFI loader, in a manner that will produce a module that may be reused for the kernel, in the future. As well, this installment will work through the steps of finding and setting a graphics mode using UEFI, so that it is available when the kernel gets booted.
Unfortunately, unlike the convenient stdin /
stdout that are already connected to
SystemTable, the GOP interface is not connected
to a simplified entity in the uefi crate. There are two methods used for accomplishing this, using
BootServices:
Accessing the Graphics Output Protocol
This can be achieved using the uefi crate via the following sequence (starting a short function to set the video mode):
fn init_fb(st: &SystemTable<Boot>) {
    let gfx = st.boot_services() // Using the BootServices object
        // Get a handle for the Graphics Output Protocol
        .get_handle_for_protocol::<uefi::proto::console::gop::GraphicsOutput>()
        // If successful...
        .and_then(|x| st.boot_services()
            // ... open the protocol and return the unwrapped GraphicsOutput handle to the caller
            .open_protocol_exclusive::<uefi::proto::console::gop::GraphicsOutput>(x)).unwrap();
}
One thing that will be noticeable through experimentation is that, after this function is called, no more console output
is possible. However, stdin is still able to successfully be used for responding to input. So, to test this, connect it
up to the hello_main function, like this:
// Tell the uefi crate that this function will be our entrypoint
#[entry]
// Declare "hello_main" to accept two arguments, and use the type definitions provided by uefi
fn hello_main(image_handle: Handle, mut system_table: SystemTable<Boot>) -> Status {
    // In order to use any of the services (input, output, etc...), they need to be manually
    // initialized by the UEFI program
    uefi_services::init(&mut system_table).unwrap();

    info!("Image Handle: {:#018x}", image_handle.as_ptr() as usize);
    info!("System Table: {:#018x}", core::ptr::addr_of!(system_table) as usize);
    info!(
        "UEFI Revision: {}.{}",
        system_table.uefi_revision().major(),
        system_table.uefi_revision().minor()
    );

    let mut karg = KernelArgs::default();
    info!("Empty karg: {:?}", karg);
    karg.populate_from_cfg_table(system_table.config_table());
    info!("Populated karg: {:?}", karg);

    let ih = IdentityAcpiHandler; // Create a new IdentityAcpiHandler
    let acpi_tables = unsafe { AcpiTables::from_rsdp(ih, karg.get_acpi().0 as usize) }.unwrap();
    info!("ACPI Revision: {}", acpi_tables.revision);

    let pcie_cfg = PciConfigRegions::new(&acpi_tables).unwrap();
    for sg in 0u16..=65535u16 {
        if let Some(addr) = pcie_cfg.physical_address(sg, 0, 0, 0) {
            karg.set_pcie(addr as *mut core::ffi::c_void);
            break;
        }
    }
    info!("karg after PCIe: {:?}", karg);

    wait_for_keypress(&mut system_table).unwrap();

    // Call the GOP setup code
    set_mode(&system_table);

    info!("Mode set"); // Notice this never gets displayed

    // Also notice the "Press a key" message never gets displayed, but you can still press a key
    // to advance program execution
    wait_for_keypress(&mut system_table).unwrap();

    // Tell the UEFI firmware we exited without error
    Status::SUCCESS
}
Running the program with the above updates will demonstrate that it stops displaying anything new
to the screen following the call to the new init_fb function. At this point, if we want to use
the display for output, we’ll need to set a video mode, get a pointer to the framebuffer, and do
the drawing ourselves.
Setting the Video Mode
The GraphicsOutput object provides some methods for interacting with the video mode-setting API:
modes- Iterate over a list of supported videoModesset_mode- Set the GPU hardware to the provided mode (which takes, as input, the same data type yielded by the iterator frommodes)query_mode- Given an index number, provide theModeobject representing it
Setting a video mode requires us to determine a width & height that we would like the display to be set to.
One complication to this is that we cannot guarantee that the video hardware offers any specific video mode, we
have to use the iterator provided by modes to scan for it. An approach that I favor (for the time being) is to
define target constants for width & height, and then iterate through the list of modes to find the highest
mode that doesn’t exceed either of these limits, and then set the video mode to this largest-identified mode, after
searching the list exhaustively.
First, I’ll define some constants that help provide an upper bound to the video mode we would like to select:
// Maximum Width & Height values for screen resolution
const MAX_WIDTH: usize = 1920;
const MAX_HEIGHT: usize = 1080;
Updating init_fb to use the above functions to accomplish this work. The below function takes the max-dimension
constants, and queries all the reported video modes from UEFI to find the largest mode that still fits within the
specified max width and height:
fn init_fb(st: &SystemTable<Boot>) {
    let mut gfx = st
        .boot_services()
        .get_handle_for_protocol::<uefi::proto::console::gop::GraphicsOutput>()
        .and_then(|x| {
            st.boot_services()
                .open_protocol_exclusive::<uefi::proto::console::gop::GraphicsOutput>(x)
        })
        .unwrap();

    // Start with setting the current "largest" mode to the first mode
    let mut curmode = 0u32;

    // Initialize both the largest width/height so far to 0, so they'll be overwritten
    // by whatever the first mode returns
    let mut curwide = 0;
    let mut curhigh = 0;

    // Iterate across all the modes - if a mode that is within our bounds, but larger than
    // the previous largest mode is identified, then set that as the new preferred mode
    for (i, m) in gfx.modes().enumerate() {
        let mode = m.info();
        // Only want 24-bit RGB modes
        if mode.pixel_format() == uefi::proto::console::gop::PixelFormat::Rgb
            || mode.pixel_format() == uefi::proto::console::gop::PixelFormat::Bgr
        {
            let (xc, yc) = mode.resolution(); // Populate temp xc/yc with the X/Y of the video mode
            if ((xc > curwide) && (xc <= MAX_WIDTH)) || ((yc > curhigh) && (yc <= MAX_HEIGHT)) {
                // If it more closely matches our constraints than any mode prior, select it
                // as the new "preferred mode"
                curmode = i as u32;
                curwide = xc;
                curhigh = yc;
            }
        }
    }

    // At the end of the loop, curmode contains the numeric index of the best-fit mode
    let newmode = gfx.query_mode(curmode).unwrap();

    // This sets the graphics mode
    gfx.set_mode(&newmode).unwrap();
}
Next, we hook this up to the hello_main from OS Experiment in Rust (part 2): UEFI Resource Access by adding a call to this function,
as well as another keyboard-wait, to the end of hello_main:
// Tell the uefi crate that this function will be our entrypoint
#[entry]
// Declare "hello_main" to accept two arguments, and use the type definitions provided by uefi
fn hello_main(image_handle: Handle, mut system_table: SystemTable<Boot>) -> Status {

...

    // Wait for a keypress before changing the video mode
    wait_for_keypress(&mut system_table).unwrap();

    // Initialize the Framebuffer
    init_fb(&mut system_table);

    // Wait for another keypress after setting the mode, so we can see it worked
    wait_for_keypress(&mut system_table).unwrap();

    // Tell the UEFI firmware we exited without error
    Status::SUCCESS
}
Rebuilding with cargo build, and then testing with ./qemu-testing/runtest.sh will allow us to step through
the existing pause-points, and past the video mode change. As discovered earlier,
after the Graphics Output Protocol sets the new video mode, the text console is no longer able to display
messages we’ve been relying upon info!() and related log crate macros to display. What this amounts to is
that, after we change the video mode we need to rely upon direct rendering to the allocated framebuffer to provide
any more output to the user.
Drawing to the Screen
The framebuffer is exactly what its name suggests: a data buffer that is used by the GPU to draw into a frame for
on-screen display. It is one contiguous buffer within which the addresses are translated to on-screen coordinates. The
following diagram describes a frame-buffer of size s*h, and how it may be mapped to the screen coordinates. Note that
the dimensional constraints are hardware-dependent, so the below relies upon variables that are made available at
run-time to the running software. Note that the width of a line (w) may be shorter than, or equal to, the stride
of a line, in order to meet memory-alignment constraints that may be inherent to the hardware.
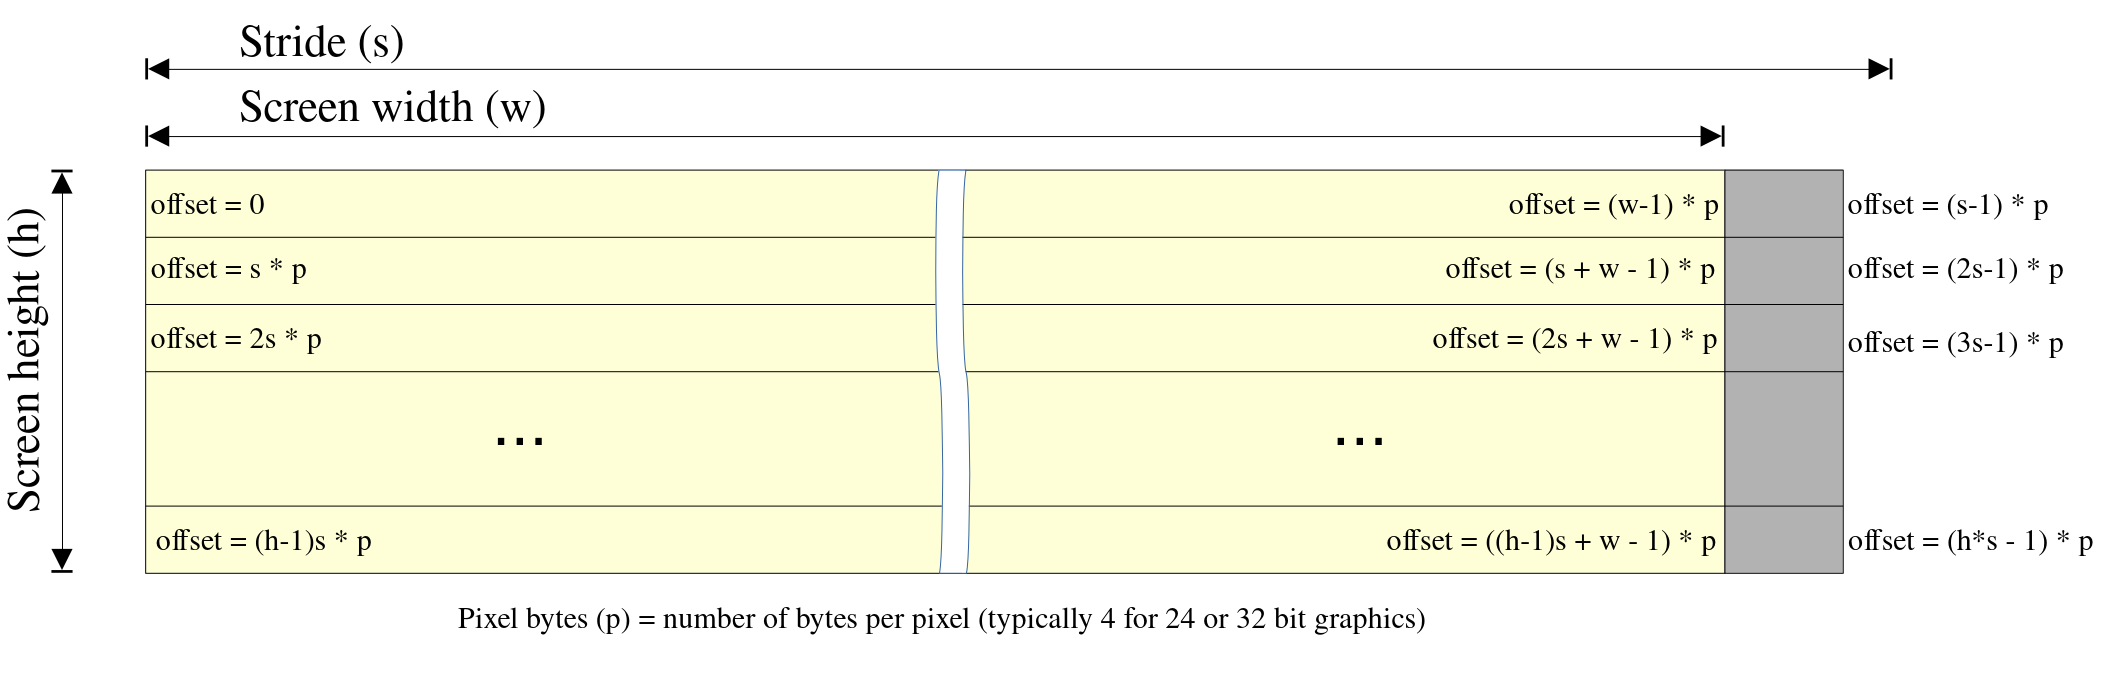
Drawing to this simply involves writing data (in our case, 4 bytes at a time) into this buffer. Drawing shapes involves writing data to calculated locations based upon the dimensions and the equations in the above diagram.
First, as we will need to access the GraphicsOutput
protocol multiple times, move the code to initialize gfx within init_fb into a dedicated function:
use uefi::table::boot::ScopedProtocol;
use uefi::proto::console::gop::GraphicsOutput;

...

fn get_gfx(st: &SystemTable<Boot>) -> ScopedProtocol<GraphicsOutput> {
    let mut gfx = st
        .boot_services()
        .get_handle_for_protocol::<GraphicsOutput>()
        .and_then(|x| {
            st.boot_services()
                .open_protocol_exclusive::<GraphicsOutput>(x)
        })
        .unwrap()
}
The first line that used to contain all of this glue code in init_fb can now be streamlined to the following:
fn init_fb(st: &SystemTable<Boot>) {
    let mut gfx = get_gfx_handle(st);

    ...
This change allows us to gain access to the UEFI Graphics Output Protocol with relative simplicity from anywhere in the code.
Drawing a Square
Drawing a simple shape to the screen is a useful way to validate that the interface is working. Later on, we’ll mess around with a crate that brings a lot of drawing primitives to us without forcing us to render everything by hand. However, before jumping in to using a more complex interface such as that, it’s important to verify that the basic logic is working correctly.
The following function will draw a white square to the screen at a hard-coded offset. In this case, that offset is (100, 100),
and it’ll have sides of 100 pixels each:
fn draw_square(st: &SystemTable<Boot>) {
    let mut gfx = get_gfx_handle(st);

    let mode_info = gfx.current_mode_info();

    // Lets draw a 2x2 square on the screen
    let top = 100 * mode_info.stride();
    let left = 100;
    let mut fb = gfx.frame_buffer();
    const WHITE_PIXEL: [u8; 3] = [0xffu8, 0xffu8, 0xffu8];
    unsafe {
        for i in 0..100 {
            // Draw the pixels of the top side
            fb.write_value((top + left + i) * 4, WHITE_PIXEL);

            // Draw the pixels of the left vertical side
            fb.write_value((top + left + i*mode_info.stride()) * 4, WHITE_PIXEL);

            // Draw the pixels of the bottom side
            fb.write_value((top + left + 100*mode_info.stride() + i) * 4, WHITE_PIXEL);

            // Draw the pixels of the right vertical side
            fb.write_value((top + left + i*mode_info.stride() + 100) * 4, WHITE_PIXEL);
        }
    };
}
The let mut fb = gfx.frame_buffer(); line is a simple wrapper function to get a FrameBuffer object. The
write_value method is a wrapper
around the frame-buffer object’s data pointer, allowing us to specify and offset (first argument), and the pixel value
(second argument, WHITE_PIXEL above) in a cleaner manner than doing a lot of pointer/slice conversion in Rust.
In the hello_main function, the info!("Mode set"); line can now be replaced by the following call to this new draw_square function:
draw_square(&mut system_table);
Compile and run the new code:
cargo build
./qemu-testing/runtest.sh
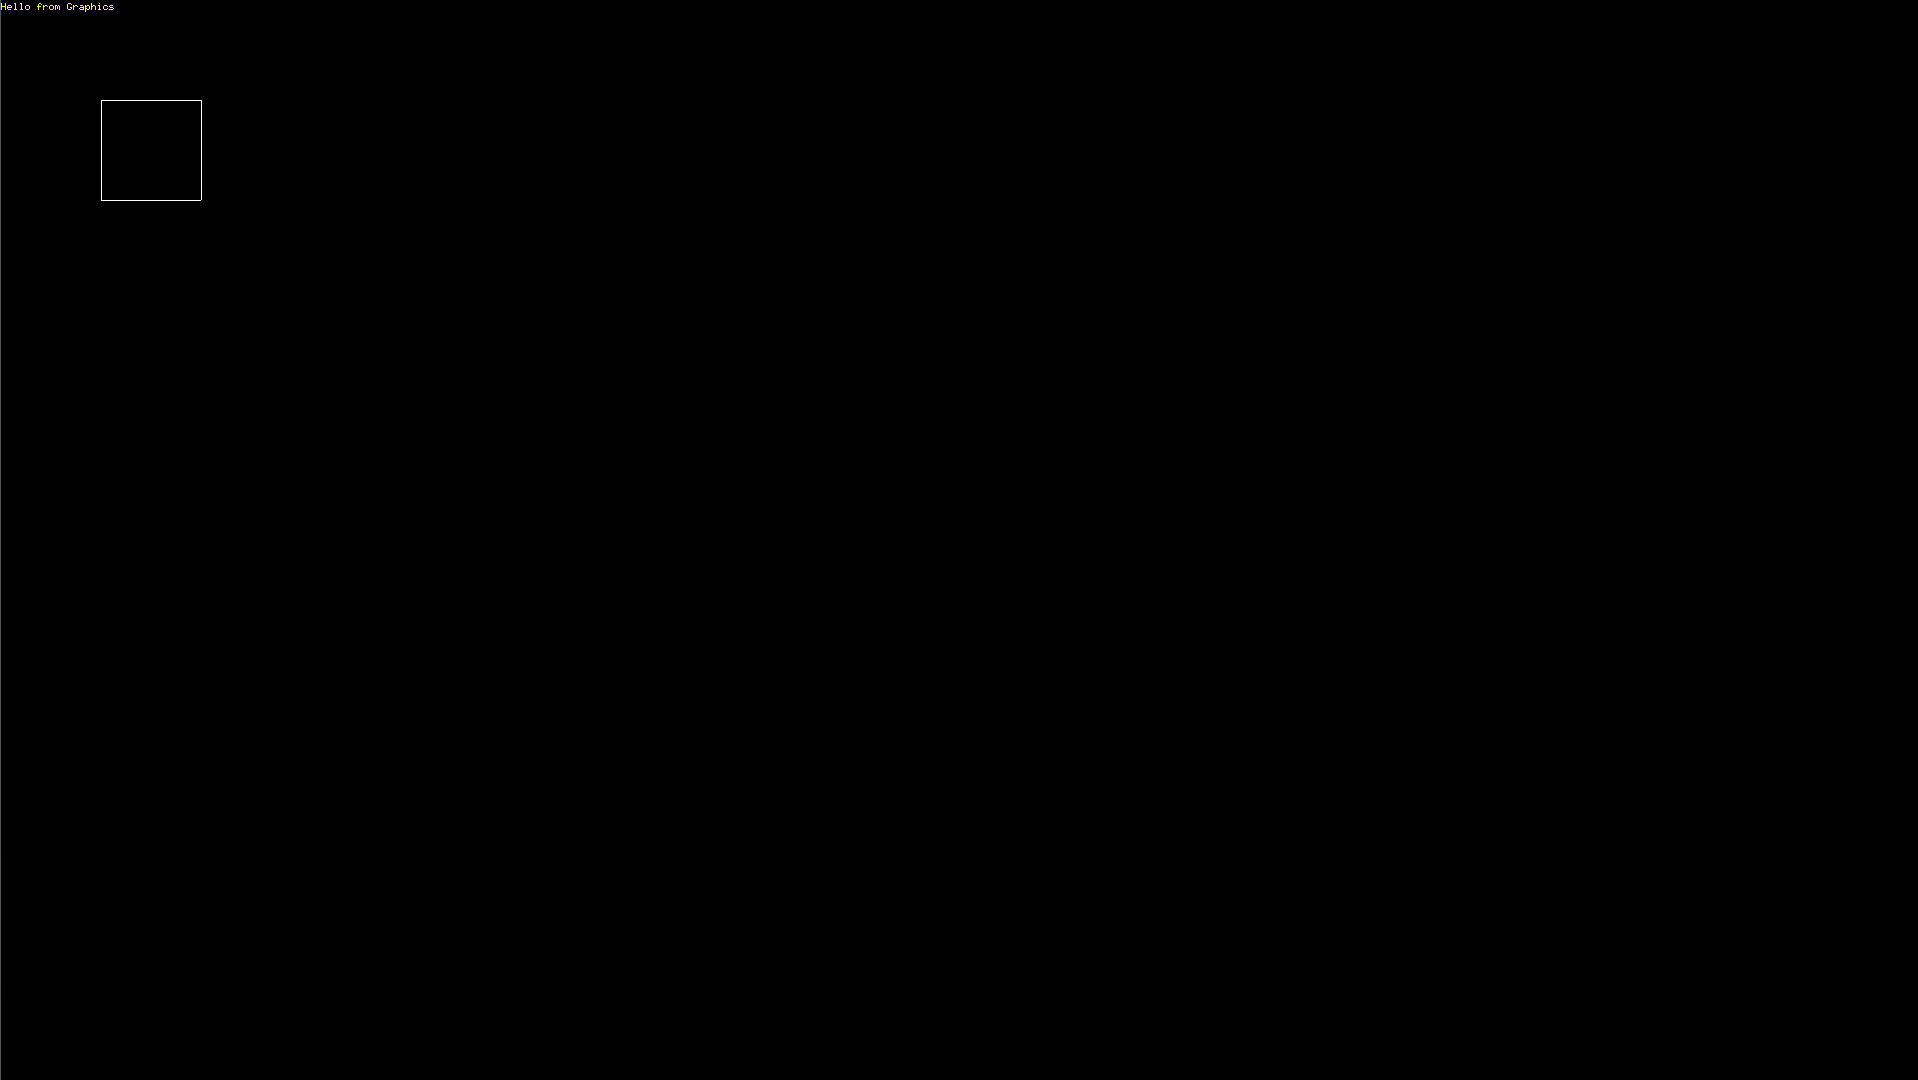
After stepping through the pause-points implemented with the wait_for_keypress function, the video mode should change as before, but
this time a 100x100 pixel rectangle will be visible in the upper-left quadrant of the screen:

Adding an Embedded Graphics Crate
Rather than reimplement every single framebuffer drawing primitive out there, an
embedded_graphics crate already exists for Rust that is
fairly well-maintained and provides generic interfaces for shape drawing as well as text and plotting capabilities. Integrating with
the crate is as simple as implementing a single function named draw_iter in the crate’s
DrawTarget trait, on a type within
the consuming code.
First step is open up Cargo.toml and add the following dependency in the [dependencies] section:
embedded-graphics = "0.8"
A Basic Console Object
Next step, create a basic Console struct, which keeps track of vital attributes about the graphics interface provided by UEFI:
- Physical memory address of the framebuffer
- Pixel width of graphics mode
- Pixel height of graphics mode
- Horizontal “stride“ of graphics mode
We can start by creating a new src/console.rs file which defines this new data type, as well as implements a constructor that
can populate it based upon the object returned by the get_gfx function implemented earlier:
use embedded_graphics::draw_target::DrawTarget;
use embedded_graphics::geometry::{OriginDimensions, Point, Size};
use embedded_graphics::pixelcolor::Rgb888;
use embedded_graphics::Pixel;
use embedded_graphics::prelude::*;
use uefi::proto::console::gop::{GraphicsOutput, PixelFormat};
use uefi::table::boot::ScopedProtocol;

/// A Console type which keeps track of dimensional and address data for the
/// FrameBuffer provided by UEFI
pub struct Console {
    /// The address pointer of the framebuffer
    fbptr: *mut u8,

    /// The width (in pixels) of a framebuffer row
    fbwidth: usize,

    /// The number of framebuffer rows on the screen
    fbheight: usize,

    /// The "stride" width of a framebuffer row (stride >= fbwidth)
    fbstride: usize,

    /// The Pixel Format
    pixel_format: PixelFormat,
}

impl Console {
    /// Takes a `GraphicsOutput` scoped protocol and instantiates a new Console
    /// object based upon the current mode info and framebuffer address
    pub fn new_from_uefi_gfx(mut gfx: ScopedProtocol<GraphicsOutput>) -> Self {
        let mode_info = gfx.current_mode_info();
        let (w, h) = mode_info.resolution();
        Console {
            fbptr: gfx.frame_buffer().as_mut_ptr(),
            fbwidth: w,
            fbheight: h,
            fbstride: mode_info.stride(),
            pixel_format: mode_info.pixel_format(),
        }
    }
}
Pivoting back over to src/main.rs, the following mod and use lines added in the appropriate
locations near the top of the file will expose this new crate and struct to the
UEFI loader:
mod console;
...
use crate::console::Console;
...
Then, further down in the hello_main function, add the following to set up the new Console instance
right after the draw_square call draws the square to the screen.
fn hello_main(image_handle: Handle, mut system_table: SystemTable<Boot>) -> Status {
    ...

    // Call the GOP setup code
    set_mode(&system_table);

    // Draw the white 100x100 square at (100, 100)
    draw_square(&mut system_table);

    // Allocate a new Console instance to be used for more advanced drawing features
    let con = Console::new_from_uefi_gfx(get_gfx_handle(&mut system_table));

    // Also notice the "Press a key" message never gets displayed, but you can still press a key
    // to advance program execution
    wait_for_keypress(&mut system_table).unwrap();

    // Tell the UEFI firmware we exited without error
    Status::SUCCESS
}
At this stage, what’s output to the screen won’t change, but building & running this code will validate that it is properly written and (likely) operates as intended.
Implementing a DrawTarget for the Console
First, an OriginDimensions trait
must be implemented. This is necessary so that the DrawTarget code can recognize the dimensions of the display. Add the following
to src/console.rs:
impl OriginDimensions for Console {
    fn size(&self) -> Size {
        Size::new(self.fbwidth as u32, self.fbheight as u32)
    }
}
After that, we will want to create a localized error type that can be used to report errors to the callers:
pub enum ConsoleError {
    BoundsError,
}
Next step is to implement the DrawTarget trait
on this new Console object, which will allow the embedded-graphics code to use a standard interface to draw onto the framebuffer.
impl DrawTarget for Console {
    /// Code is simplified (for now) by statically setting the Color to Rgb888
    type Color = Rgb888;
    type Error = ConsoleError;
    fn draw_iter<I>(&mut self, pixels: I) -> Result<(), Self::Error>
    where
        I: IntoIterator<Item = Pixel<Self::Color>>,
    {
        for Pixel(Point { x: px, y: py }, color) in pixels.into_iter() {
            // Convert point positions to usize
            let x = px as usize;
            let y = py as usize;
            if (x < self.fbwidth) && (y < self.fbheight) {
                /* Calculate offset into framebuffer */
                let offset = (y * (self.fbstride * 4)) + (x * 4);
                let fbsize = self.fbstride * self.fbheight * 4;
                let fb = unsafe { core::slice::from_raw_parts_mut(self.fbptr, fbsize) };
                fb[offset + 1] = color.g();

                // Support swapped-ordering when we are a BGR versus RGB Console. This handles
                // the conversion required because we set the DrawTarget's Color type to Rgb888
                // for code simplicity.
                if self.pixel_format == PixelFormat::Bgr {
                    fb[offset] = color.b();
                    fb[offset + 2] = color.r();
                } else {
                    fb[offset] = color.r();
                    fb[offset + 2] = color.b();
                }
            } else {
                // If given an invalid bound, then return an error
                return Err(ConsoleError::BoundsError)
            }
        }
        Ok(())
    }
}
Add a write_str Function
Now that the DrawTarget is implemented, it is possible for us to use it with any of the code implementing the
Drawable trait. As displaying text
to the screen is a necessary feature, we’ll next implement functionality to draw strings onto the screen at a given
location.
To start off, some more modules need to be added to our Console in src/console.rs via the use keyword:
...
use embedded_graphics::mono_font::{ascii::FONT_6X10, MonoTextStyle};
use embedded_graphics::text::Text;
...
Then, in the impl Console implementation, add a new function:
impl Console {
    ...

    /// Writes the string constant in s to the location (x, y). Note the y location refers to the
    /// lower-left corner of the character box, rather than the upper-left corner.
    pub fn write_str<'a>(&mut self, s: &'a str, x: i32, y: i32) -> Result<(), ConsoleError> {
        // Allocate a style to display Yellow text using a 6x10 built-in font
        let sty = MonoTextStyle::new(&FONT_6X10, Rgb888::YELLOW);

        // Create the text graphic, and write it to the Console (self)
        Text::new(s, Point::new(x, y), sty).draw(self)?;
        Ok(())
    }
}
And, finally, we can return to hello_main in src/main.rs and add a call to this new function, to display text
at the upper-left corner of the screen:
fn hello_main(image_handle: Handle, mut system_table: SystemTable<Boot>) -> Status {
    ...

    // Call the GOP setup code
    set_mode(&system_table);

    // Draw the white 100x100 square at (100, 100)
    draw_square(&mut system_table);

    // Allocate a new Console instance to be used for more advanced drawing features
    let con = Console::new_from_uefi_gfx(get_gfx_handle(&mut system_table));

    // Write "Hello from Graphics" to the upper-left corner of the screen
    let _ = con.write_str("Hello from Graphics", 0, 9);

    // Also notice the "Press a key" message never gets displayed, but you can still press a key
    // to advance program execution
    wait_for_keypress(&mut system_table).unwrap();

    // Tell the UEFI firmware we exited without error
    Status::SUCCESS
}
If everything is working correctly, after cargo build and then ./qemu-testing/runtest.sh the final stage (so far)
of the boot process should display this message in the upper-left of the screen. This is also a helpful example to demonstrate
that the new DrawTarget code doesn’t take ownership of the framebuffer, but rather it just uses it. So, you can choose to switch
between the Drawable-implementing code in embedded-graphics and any custom rendering code without conflict:
Conclusion
In this entry, we used uefi to move away from a text-only interface to a graphical framebuffer interface, initialized by the UEFI
firmware. Though still working from a UEFI bootloader, setting this up using standard & generic UEFI interfaces ahead of bootstrapping
the kernel will enable us to provide a richer visual interface without having to implement the hardware-specific details of a vendor-specific
GPU driver. In contrast to native-GPU interaction, the UEFI framebuffer will definitely suffer from a performance deficit.
The source code for Part 3 is located here:
Permanent Link: https://blog.malware.re/2023/11/12/rust-os-part3/index.html