OS Experiment in Rust (part 1): Creating a UEFI Loader
Long ago, in the mid-late 1990’s, I got interested in the low-level operations of my PC and was determined to write a somewhat simple hobby OS in order to teach myself how the system worked under the hood. At the time, I wrote it all in assembly on my 486, and the goal was to make something that would bootstrap to 32-bit protected mode and also interact with the core hardware components on the system: VESA, IDE, 8042 keyboard controller, the Floppy Disk Controller, etc. Recently, I became interested again in exploring this space, but “PC” hardware has come a long way - both in terms of features as well as standards. So (if I stick to it), I’ll put together a series of intermittently-written blog articles that document my experience revisiting this hobby on modern systems, targeting a minimum set of system hardware requirements that are commonplace on pretty much every PC designed in the past 5 years.
Scope
Rather than play with antiquated hardware oddities, like bootstrapping from an 8086 instruction set & memory access mode, a CPU that boots up with its 21st address line disconnected, and other obnoxious legacy details, I want to explore what it’s like to bootstrap from a modern system that has UEFI firmware.
Beyond just the UEFI requirement, I also want to optimize the experience by enforcing the following minimum requirements
- UEFI boots into 64-bit “Long Mode”
- PCI-express
- MMIO access to the hardware, rather than the old port-IO mechanisms (enhanced configuration mechanism)
- Message-Signaled Interrupts (MSI/MSI-X) for interrupt signal generation
- AHCI storage controller
- USB input devices & storage (UHCI)
- UEFI Framebuffer support that persists post-boot
- ACPI (largely for hardware configuration information)
Additionally, I’d like to explore this project in Rust, because I’d like to also explore Rust’s features for
compiling & linking an executable without libstd and without a libc.
In practice, this means the project will need to employ two main components:
- a UEFI bootloader, that is a 64-bit PE executable loaded & executed by the UEFI firmware, and
- a Kernel of our own design that is loaded into memory by the bootloader from #1, and has control transferred to it
Preferrably, I’d like the kernel in #2 to be compiled as a stand-alone binary. However, following the PE format, there are mechanisms to store arbitrary section, resource, and slack data in PE files, and embedding the kernel in the bootloader is already a technique employed with Linux called EFI stub.
Create New UEFI Loader Project
Need to install the toolchain to output an x86-64 UEFI program. This is not part of the typical install, but Rust makes it fairly easy with *-unknown-uefi toolchains distributed by the project.
rustup target add x86_64-unknown-uefi
We want to create a new binary project and prepare the project directory:
cargo new uefiloader --bin
cd uefiloader
mkdir -p .cargo/
Within the project directory, create a new file named rust-toolchain.toml with the following content:
[toolchain]
targets = ["x86_64-unknown-uefi"]
Then, also create a file named .cargo/config.toml with the following content:
[build]
target = "x86_64-unknown-uefi"
Doing this will help make the environment easier to build within.
Initial Build Test Failure Analysis
Trying to build yields some errors:
cargo build
   Compiling uefiloader v0.1.0 (/home/user/src/uefi-rust-os/part1/uefiloader)
error[E0463]: can't find crate for `std`
  |
  = note: the `x86_64-unknown-uefi` target may not support the standard library
  = note: `std` is required by `uefiloader` because it does not declare `#![no_std]`

error: cannot find macro `println` in this scope
 --> src/main.rs:2:5
  |
2 |     println!("Hello, world!");
  |     ^^^^^^^

error: `#[panic_handler]` function required, but not found

For more information about this error, try `rustc --explain E0463`.
error: could not compile `uefiloader` (bin "uefiloader") due to 3 previous errors
The above set of errors help demonstrate the challenge ahead. Rust pre-populates the project with a simple boilerplate “Hello World“ application, designed to be run from the command line. The following constraints exist that prevent the straightforward example from building for the UEFI target:
- No “
stdruntime library” (can't find crate for 'std') - The
println!macro is provided by thestdcrate (thus, the compiler cannot find it) - There is no function declared as the
#[panic_handler]
The boilerplate program created by cargo in the src/main.rs file is as follows:
fn main() {
    println!("Hello, world!");
}
The second note for the first error gives the initial hint that we’ll need to address: telling Rust
that we need to add #![no_std] to the code. Also, the second error indicates that we won’t be able
to rely upon the println! macro, like we use for most command-line programs. So, we can try addressing
both of these issues with the following changes:
#![no_std]
fn main() {
    //println!("Hello, world!");
}
Compiling the new version yields the following error (basically re-reporting the last error from earlier):
   Compiling uefiloader v0.1.0 (/home/user/src/uefi-rust-os/part1/uefiloader)
error: `#[panic_handler]` function required, but not found

error: could not compile `uefiloader` (bin "uefiloader") due to previous error
Panic Handler
We can look up information about the panic_handler in the Rust language documentation:
There are a few examples documented there, the simplest of which is:
#![no_std]

use core::panic::PanicInfo;

#[panic_handler]
fn panic(_info: &PanicInfo) -> ! {
    loop {}
}
It turns out that Rust, with its run-time consistency checker, needs to have a handler to pass control to when the code encounters some sort of memory error or other run-time error (for instance, an out-of-bounds error on an array). In C, and assembly, run-time bounds-checking (and overflow-prevention) is typically employed by the developer as needed, but Rust integrates this capability within the language itself. Thus, it expects there to be a function available at run-time that will handle a panic condition to halt program execution if such a condition is detected, or any number of other conditions are detected, which could lead to common run-time vulnerabilities that would otherwise be exploitable.
Using the above example, we can modify the most recent revision of our program to be as follows:
#![no_std]

use core::panic::PanicInfo;

#[panic_handler]
fn ph(_info: &PanicInfo) -> ! {
    loop {}
}

fn main() {
    //println!("Hello, world!");
}
Compiling this silences all the prior errors, but produces a new error:
   Compiling uefiloader v0.1.0 (/home/user/src/uefi-rust-os/part1/uefiloader)
error: requires `start` lang_item

error: could not compile `uefiloader` (bin "uefiloader") due to previous error
Entry Point
The error requires `start` lang_item suggests that some sort of “start“ tag needs to be added
somewhere in reference to main. Unfortunately, this isn’t as straightforward or correct as the earler no_std suggestion.
In UEFI, the entry point to the program is no longer the main() function. Reading some of the
lang_items documentation you will learn that
the first thing we need to do here is add #![no_main], so that Rust doesn’t try to expect there to be a Rust main() function.
#![no_std]
#![no_main]

use core::panic::PanicInfo;

#[panic_handler]
fn ph(_info: &PanicInfo) -> ! {
    loop {}
}

fn main() {
    //println!("Hello, world!");
}
Compiling this version, yields the following link error, which indicates the program compiled correctly, but the final binary failed to link:
   Compiling uefiloader v0.1.0 (/home/user/src/uefi-rust-os/part1/uefiloader)
warning: function `main` is never used
  --> src/main.rs:11:4
   |
11 | fn main() {
   |    ^^^^
   |
   = note: `#[warn(dead_code)]` on by default

error: linking with `rust-lld` failed: exit status: 1
  |
  = note: LC_ALL="C" PATH="/home/user/.rustup/toolchains/stable-x86_64-unknown-linux-gnu/lib/rustlib/x86_64-unknown-linux-gnu/bin:/home/user/.cargo/bin
  :/usr/local/sbin:/usr/local/bin:/usr/bin:/home/user/.dotnet/tools:/usr/lib/jvm/default/bin:/usr/bin/site_perl:/usr/bin/vendor_perl:/usr/bin/core_perl:
  /usr/lib/rustup/bin" VSLANG="1033" "rust-lld" "-flavor" "link" "/NOLOGO" "/entry:efi_main" "/subsystem:efi_application" "/tmp/rustcfizO20/symbols.o"
  "/home/user/src/uefi-rust-os/part1/uefiloader/target/x86_64-unknown-uefi/debug/deps/uefiloader-523980f5f2afd7f2.3uvdlcgxu6jsbuf9.rcgu.o"
  "/LIBPATH:/home/user/src/uefi-rust-os/part1/uefiloader/target/x86_64-unknown-uefi/debug/deps"
  "/LIBPATH:/home/user/src/uefi-rust-os/part1/uefiloader/target/debug/deps"
  "/LIBPATH:/home/user/.rustup/toolchains/stable-x86_64-unknown-linux-gnu/lib/rustlib/x86_64-unknown-uefi/lib"
  "/home/user/.rustup/toolchains/stable-x86_64-unknown-linux-gnu/lib/rustlib/x86_64-unknown-uefi/lib/librustc_std_workspace_core-c4e7c15a2a13765b.rlib"
  "/home/user/.rustup/toolchains/stable-x86_64-unknown-linux-gnu/lib/rustlib/x86_64-unknown-uefi/lib/libcore-5b299cbe0d04ef5a.rlib"
  "/home/user/.rustup/toolchains/stable-x86_64-unknown-linux-gnu/lib/rustlib/x86_64-unknown-uefi/lib/libcompiler_builtins-abad2856da2097fa.rlib"
  "/NXCOMPAT" "/LIBPATH:/home/user/.rustup/toolchains/stable-x86_64-unknown-linux-gnu/lib/rustlib/x86_64-unknown-uefi/lib"
  "/OUT:/home/user/src/uefi-rust-os/part1/uefiloader/target/x86_64-unknown-uefi/debug/deps/uefiloader-523980f5f2afd7f2.efi" "/OPT:REF,NOICF"
  "/DEBUG" "/NODEFAULTLIB"
  = note: rust-lld: error: <root>: undefined symbol: efi_main


warning: `uefiloader` (bin "uefiloader") generated 1 warning
error: could not compile `uefiloader` (bin "uefiloader") due to previous error; 1 warning emitted
The most important message here is undefined symbol: efi_main, and this explains a more accurate “next step”. The #![no_main] directive will be
broadly important to remember for any Rust development targeting any output other than a standard command-line utility, as it helps quiet one of the
compiler’s language expectations about where the program execution should start. In the case of a UEFI program, the program entry point will instead
be named efi_main, and unlike the standard “C” main functions, it takes arguments from the UEFI firmware.
The definition of the efi_main function is a C-language function, and an example of implementing it in C is available here:
The efi_main function is declared there as follows:
EFI_STATUS
EFIAPI
efi_main (EFI_HANDLE ImageHandle, EFI_SYSTEM_TABLE *SystemTable) {
   InitializeLib(ImageHandle, SystemTable);
   Print(L"Hello, world!\n");

   return EFI_SUCCESS;
}
The types EFI_HANDLE and EFI_SYSTEM_TABLE * are both pointer types. These can be cast to void* types, which Rust has an implementation of,
as well: *mut core::ffi::c_void (which we can use as an imported symbol). Additionally, Rust offers a feature very similar to C++ which allows
us to declare a fn to be a “C function”: extern "C". The EFI_STATUS return is defined by the EFI specification as an integer value that
informs the firmware whether the boot attempt resulted in an error or success. Finally, the efi_main function needs to be exported so that the
UEFI firmware can examine your EFI binary and locate it. This is achieved via the
export_name attribute.
So, we can modify the earlier program in the following manners:
- Rename
maintoefi_main - Have
efi_mainaccept two mutable pointer arguments - Declare
efi_mainas apub extern "C"function - Return a
usizewhich tells the compiler we will pass an int back to the firmware
#![no_std]
#![no_main]

use core::panic::PanicInfo;
use core::ffi::c_void; // For c_void type

#[panic_handler]
fn ph(_info: &PanicInfo) -> ! {
    loop {}
}

#[export_name = "efi_main"]
pub extern "C" fn efi_main(_image: *mut c_void, _system_table: *mut c_void) -> usize {
    //println!("Hello, world!");
    0 // EFI_SUCCESS is error code 0
}
Running cargo build now, results in the following successful build output:
   Compiling uefiloader v0.1.0 (/home/user/src/uefi-rust-os/part1/uefiloader)
    Finished dev [unoptimized + debuginfo] target(s) in 0.03s
This EFI program doesn’t do much (yet). Running objdump -d target/x86_64-unknown-uefi/debug/uefiloader.efi
yields a short disassembly of the program, starting at the efi_main entry point:
target/x86_64-unknown-uefi/debug/uefiloader.efi:     file format pei-x86-64


Disassembly of section .text:

0000000140001000 <.text>:
   140001000:   48 83 ec 10             sub    $0x10,%rsp
   140001004:   48 89 0c 24             mov    %rcx,(%rsp)
   140001008:   48 89 54 24 08          mov    %rdx,0x8(%rsp)
   14000100d:   31 c0                   xor    %eax,%eax
   14000100f:   48 83 c4 10             add    $0x10,%rsp
   140001013:   c3                      ret
The command ls -l target/x86_64-unknown-uefi/debug/uefiloader.efi further indicates a small, 2kB, executable:
-rwxr-xr-x 2 user user 1536 Aug 21 11:25 target/x86_64-unknown-uefi/debug/uefiloader.efi
The above program will simply exit with success back to the UEFI firmware. On most systems, this may result in an endless reboot loop, or it may result in sending you to the firmware menu, depending upon the system config.
The uefi Crate
The above example takes some liberties in using generic pointer types in place of EFI-specific types that were referenced in the C-language example. The C example makes use of some pre-written headers for UEFI development. The Rust project also has similar projects distributed as crates:
These crates offers some helpful features that, when used, streamline the development of UEFI applications such as our simple loader:
- An internal
efi_mainwrapper implementation to let our “main” be a normal Rust function - An internal
panic_handlerimplementation so we don’t need our own - Common UEFI services, such as keyboard input, console output, and more, are exposed via Rust-friendly interfaces
- Console output support is integrated with the
logcrate, so pretty console logging works similarly to other Rust projects
A simple tutorial exists in the documentation, starting here:
In this case, the basic “hello world” program from the example provided in the tutorial is as follows:
#![no_main]
#![no_std]

use log::info;
use uefi::prelude::*;

#[entry]
fn main(_image_handle: Handle, mut system_table: SystemTable<Boot>) -> Status {
    uefi_services::init(&mut system_table).unwrap();
    info!("Hello world!");
    system_table.boot_services().stall(10_000_000);
    Status::SUCCESS
}
The above requires us to add the log, uefi, and uefi-services crates to our project dependencies. So, edit the Cargo.toml
file, and add the following dependencies (creating the [dependencies] section, if it doesn’t already exist):
[dependencies]
log = "0.4"
uefi = "0.24"
uefi-services = "0.21"
Then do a cargo update which should pull down the necessary crate sources:
    Updating crates.io index
      Adding bit_field v0.10.2
      Adding bitflags v2.4.0
      Adding cfg-if v1.0.0
      Adding log v0.4.20
      Adding proc-macro2 v1.0.66
      Adding ptr_meta v0.2.0
      Adding ptr_meta_derive v0.2.0
      Adding quote v1.0.33
      Adding syn v1.0.109
      Adding syn v2.0.29
      Adding ucs2 v0.3.2
      Adding uefi v0.24.0
      Adding uefi-macros v0.12.0
      Adding uefi-raw v0.3.0
      Adding uefi-services v0.21.0
      Adding uguid v2.0.1
      Adding unicode-ident v1.0.11
Replace the old src/main.rs content with the version provided in the example. Below, I have copied it and then
added some comments about what’s going on at each step in the code. This will be useful when expanding the code to
add more capabilities:
#![no_main]
#![no_std]

// Use the abstracted log interface for console output
use log::info;

// Import a bunch of commonly-used UEFI symbols exported by the crate
use uefi::prelude::*;

// Tell the uefi crate that this function will be our program entry-point
#[entry]
// Declare "hello_main" to accept two arguments, and use the type definitions provided by uefi
// Notice that this no longer needs to be declared "extern" or "pub"
fn hello_main(_image_handle: Handle, mut system_table: SystemTable<Boot>) -> Status {
    // In order to use any of the services (input, output, etc...), they need to be manually
    // initialized by the UEFI program
    uefi_services::init(&mut system_table).unwrap();

    // Display an INFO message of "Hello world!" to the default UEFI console (typically the screen)
    info!("Hello world!");

    // Pause for 10 seconds
    system_table.boot_services().stall(10_000_000);

    // Tell the UEFI firmware we exited without error
    Status::SUCCESS
}
Running cargo build now will result in no errors and a new, slightly larger, EFI binary will be present:
-rwxr-xr-x 2 user user 60928 Aug 21 12:19 target/x86_64-unknown-uefi/debug/uefiloader.efi
So now we have a ˜60kB UEFI binary that (allegedly) writes “Hello world!“ to the screen, waits 10
seconds, then exits back to firmware.
Testing With QEMU
Hypothetically, this can be tested on any virtualization platform that supports UEFI. I’m going to use QEMU for a few reasons:
- Free
- Open-source
- Popular and well-documented
- Supports UEFI firmware, and comes with robust reference firmware
- Allows a directory to be virtualized as a filesystem on a disk device
The last item in that list makes it really easy to work with files, without having to worry about building disk images for each boot, at the cost of some loss in persistence capabilities.
Much of the below content is based upon the really great documentation in The Rust UEFI Book:
x86-64 UEFI Boot Process
Typically, the UEFI firmware in an x86-64 system will boot up, initialize the hardware, and then search the
boot device GPT partition tables for any partitions marked
as EFI System type (type 0x01). It will look for an EFI program at efi/boot/bootx64.efi and load & execute
it, if it exists. Otherwise, it will move on through the discovered devices’ EFI System partitions, until exhausted.
The search list will typically be limited to a set of devices registered in the firmware. This can be set manually, or
can be a list auto-detected by the boot firmware - it really varies system to system what the out-of-box behavior will
be.
Setting Up a QEMU Test Environment
You’ll want to install the qemu-full package, or whatever its equivalent is on your system/distribution. Following
the instructions at the QEMU website should suffice if you are in doubt. Once installed, you
should have the qemu-system-x86_64 binary in your $PATH.
Make a new directory that will contain your simulated EFI System Partition (typically abbreviated esp):
mkdir -p ./qemu-testing/esp/efi/boot/
Then, use a symlink to point efi/boot/bootx64.efi at your target/x86_64-unknown-uefi/debug/uefiloader.efi binary:
ln -sf ../../../../target/x86_64-unknown-uefi/debug/uefiloader.efi \
    ./qemu-testing/esp/efi/boot/bootx64.efi
Next, it is recommended (by the Rust UEFI Book) to make local copies of the firmware files. In the example from the
Rust UEFI Book, these are files named OVMF_CODE.fd and OVMF_VARS.fd located at /usr/share/OVMF. On my system,
these were located at /usr/share/edk2/x64, with the upper-level directory containing reference firmware for other
architectures as well.
It may be necessary to install the packages named edk2-ovmf or ovmf from your package repository (or manually from
https://www.kraxel.org/repos/jenkins/edk2/). Finding these can be achieved
via the following command, if in doubt:
find /usr/share /usr/local/share /opt -name OVMF_CODE.fd
Once you locate/install them (for my example, I’ll use /usr/share/edk2/x64 as the directory where they’re located),
you will want to make a copy of the CODE and corresponding VARS images into your qemu-testing/ folder:
cp /usr/share/edk2/x64/OVMF_{CODE,VARS}.fd ./qemu-testing/
Finally, create a new file qemu-testing/runtest.sh with the following content:
#!/bin/bash
#

pushd `pwd`
cd $(dirname $0)

exec qemu-system-x86_64 -enable-kvm \
    -drive if=pflash,format=raw,readonly=on,file=OVMF_CODE.fd \
    -drive if=pflash,format=raw,readonly=on,file=OVMF_VARS.fd \
    -drive format=raw,file=fat:rw:esp

popd
Then, make it executable:
chmod 755 ./qemu-testing/runtest.sh
The -drive format=raw,file=fat:rw:esp argument points the device to a directory, rather than a file node, and qemu
recognizes this and will create (in memory) a virtual disk that presents as having the contents of the qemu-testing/esp/
directory as the root of the filesystem. The fat parameter in the argument tells it to virtualize a FAT32 filesystem.
This feature is really handy for bridging the development and virtual testing environments without having to perform a
disk image rebuild every iteration.
Testing the UEFI “Hello world!” Loader
Now that all of that is in place, you can run your test script:
./qemu-testing/runtest.sh
If it all worked, you should see that UEFI has automatically booted into your uefiloader.efi, because the Hello world!
message is displayed:
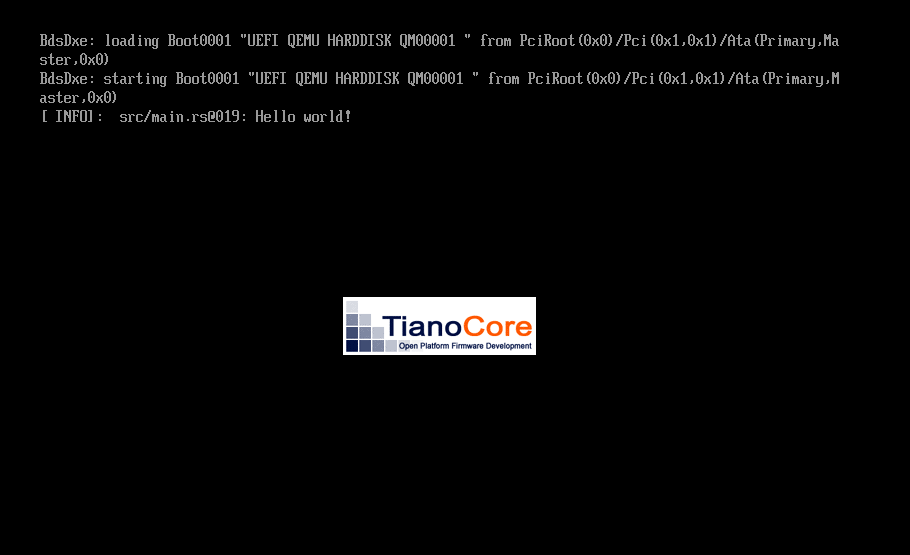
In addition to showing the message we wanted to see, the log crate integration also reports the following details, as
well:
[ INFO]: the log severity levelsrc/main.rs: the source file which generated the log message@019: the Line number in the source file that generated the message
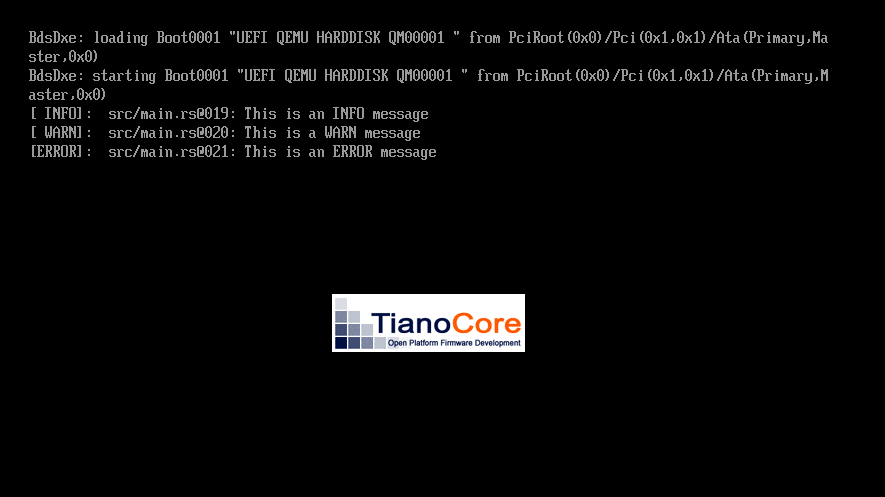
We can update the source file to use the warn and error macros, in addition to the info macro:
#![no_main]
#![no_std]

// Use the abstracted log interface for console output
use log::{info, error, warn};

// Import a bunch of commonly-used UEFI symbols exported by the crate
use uefi::prelude::*;

// Tell the uefi crate that this function will be our entrypoint
#[entry]
// Declare "hello_main" to accept two arguments, and use the type definitions provided by uefi
fn hello_main(_image_handle: Handle, mut system_table: SystemTable<Boot>) -> Status {
    // In order to use any of the services (input, output, etc...), they need to be manually
    // initialized by the UEFI program
    uefi_services::init(&mut system_table).unwrap();

    // Display an INFO message of "Hello world!" to the default UEFI console (typically the screen)
    info!("This is an INFO message");
    warn!("This is a WARN message");
    error!("This is an ERROR message");

    // Pause for 10 seconds
    system_table.boot_services().stall(10_000_000);

    // Tell the UEFI firmware we exited without error
    Status::SUCCESS
}
These macros also support the Formatter interface, which
means they can easily be used to report details about the run-time program state. Using the UEFI documentation for
uefi::table::SystemTable and
uefi::data_types::Handle, we can output some
details about the UEFI environment on boot:
#![no_main]
#![no_std]

// Use the abstracted log interface for console output
use log::{error, info, warn};

// Import a bunch of commonly-used UEFI symbols exported by the crate
use uefi::prelude::*;

// Tell the uefi crate that this function will be our entrypoint
#[entry]
// Declare "hello_main" to accept two arguments, and use the type definitions provided by uefi
fn hello_main(image_handle: Handle, mut system_table: SystemTable<Boot>) -> Status {
    // In order to use any of the services (input, output, etc...), they need to be manually
    // initialized by the UEFI program
    uefi_services::init(&mut system_table).unwrap();

    info!("This is an INFO message");
    warn!("This is a WARN message");
    error!("This is an ERROR message");
    info!("Image Handle: {:#018x}", image_handle.as_ptr() as usize);
    info!("System Table: {:#018x}", core::ptr::addr_of!(system_table) as usize);
    info!(
        "UEFI Revision: {}.{}",
        system_table.uefi_revision().major(),
        system_table.uefi_revision().minor()
    );

    // Pause for 10 seconds
    system_table.boot_services().stall(10_000_000);

    // Tell the UEFI firmware we exited without error
    Status::SUCCESS
}
The results, displayed in the logging messages to the UEFI console:

Conclusion
This project introduces programming on the UEFI target using Rust and some crates to help with the underlying details. A GitHub repository is available which will be updated as more entries are published in this series:
Continue on to: OS Experiment in Rust (part 2): UEFI Resource Access
Permanent Link: https://blog.malware.re/2023/08/20/rust-os-part1/index.html