Adding MCP to CTIgor
The Model Context Protocol is an API standard that has been making the rounds in the GenAI community recently. It is an open standard that is being promoted and maintained by Anthropic for the benefit of the braoder community. In a nutshell, it can be used to expose an API for GenAI use as well as provide AI-discoverable inventory of tools utilizing a specification similar to the Functions/Tools I demonstrated in my earlier two blog posts (CTIgor: An Agentic CTI Assistant, Porting CTIgor to AutoGen). In this entry, I will demonstrate porting those tools over to a new, separate, MCP server, which can make them available to more agents without having them hard-coded.

Introduction
Model Context Protocol (MCP) offers a standard API that can be interfaced by the agentic frameworks to enumerate external tools to be made available to LLMs. An MCP server hosts an API that an agent can use to discover task-specific tools from at run-time. The “MCP Server” itself runs as a dedicated process, while the agents can implement an MCP Client interface that incorporates the discovered tools from the MCP into the prompt, using a mechanism very similar to the tool definitions from my earlier blog posts:
Installation of MCP
The MCP project offers a powerful Python framework for building MCP Servers, available as mcp from PyPI:
It implements the reference protocol and is maintained by the same maintainers of the overall specification, so it remains fairly
updated with the publicly announced features. Additionally, the mcp Python framework offers a really helpful “debug mode” that
offers running a locally-hosted web UI that can allow you to navigate the tools exported by your MCP server.
As the prior two blog posts described some basic tools, we will focus on implementing those in a new MCP server, and moving them
out of the agent code. One of the benefits to this is that it can allow an architecture where the available tools exposed via MCP
to change without having to restart or redeploy agents - allowing for additional features (as MCP tools) to be rolled out independent
of agent releases. Adding the mcp[cli] package from PyPI will install the necessary MCP Python package, as well as the mcp
command-line tool, which can be used for manually running the MCP server, including in the debug/testing mode I described earlier.
uv add 'mcp[cli]'
Then, this allows the mcp tool to be executed from within the virtual environment:
uv run mcp
Usage: mcp [OPTIONS] COMMAND [ARGS]...

 MCP development tools

╭─ Options ─────────────────────────────────────────────────────────────────────────────────────────────────────────────────────────────────────────╮
│ --help          Show this message and exit.                                                                                                       │
╰───────────────────────────────────────────────────────────────────────────────────────────────────────────────────────────────────────────────────╯
╭─ Commands ────────────────────────────────────────────────────────────────────────────────────────────────────────────────────────────────────────╮
│ version   Show the MCP version.                                                                                                                   │
│ dev       Run a MCP server with the MCP Inspector.                                                                                                │
│ run       Run a MCP server.                                                                                                                       │
│ install   Install a MCP server in the Claude desktop app.                                                                                         │
╰───────────────────────────────────────────────────────────────────────────────────────────────────────────────────────────────────────────────────╯
Build a Simple Tool Function
One of the features that tools can offer is context-aware overrides for LLM responses. Take for an example the following conversation with CTIgor about some generally-accepted knowledge that was likely in the source material used for building the model:
uv run ctigor_summarize.py -i
CTIgor> What color is a banana?
=======
A banana is typically yellow when it is ripe. However, it can also be green when unripe and brown or black when overripe.
=======
Or, more elaborate:
CTIgor> What colors are a banana, strawberry, and orange?
=======
- A banana is generally yellow when ripe, green when unripe, and brown or black when overripe.
- A strawberry is red when ripe, and it can also have green leaves and white flowers.
- An orange is typically orange when ripe, though it can also be green if not fully ripe or in certain varieties.
=======
Let’s say we want to define a tool that will return certain fruits’ colors when asked about certain kinds of fruit. A simple function implementation in MCP for this might be:
def fruit_kind_color(
    kind: Annotated[str, "The name of the fruit we want to look up the color of"],
) -> Annotated[str, "The color of the fruit named in kind"]:
    """Given a fruit name in kind, if it is known then return its color as a string.
       If unknown, then the tool will return a None response"""
    if kind == "strawberry" or kind == "tomato":
        return "red"
    elif kind == "banana":
        return "yellow"
    elif kind == "mango":
        return "green"

    return None
Fairly straightforward, the above accepts the strings strawberry, tomato
(yes, it is a fruit), banana, and mango. The
function will return red, yellow, or green, depending upon the input provided. If the caller provides anything else
that isn’t one of those inputs, the Python NULL value None will be returned.
Create an MCP Server With fruit_kind_color Tool
The mcp package includes a rapid-development class named FastMCP which had
been a separate project that was more recently merged into the main mcp codebase. This tool is now available in the
mcp.server.fastmcp sub-module. For
brevity, we will use this to construct the MCP server, as it will handle a lot of the details under the hood. Using
the FastMCP API requires some specific architectural choices, namely:
- Instantiate an
mcpglobal object within the Python script, which should be an instance ofFastMCP - Use the
@mcp.tooldecorator (toolbeing exposed from themcpinstance) to define functions as exported by MCP
Incorporating these pieces, plus importing required dependencies, results in a script that looks like this, I
will save it as mcp_server_fruit.py:
import asyncio
from mcp.server.fastmcp import FastMCP
from typing import Annotated

# Construct an MCP Server named FruitMCP
mcp = FastMCP("FruitMCP")

# Declare a tool function named fruit_kind_color that takes a string describing the kind of
# fruit being inquired about, and returns a server-defined color for that fruit
@mcp.tool()
def fruit_kind_color(
    kind: Annotated[str, "The name of the fruit we want to look up the color of"],
) -> Annotated[str, "The color of the fruit named in kind"]:
    """Given a fruit name in kind, if it is known then return its color as a string.
       If unknown, then the tool will return a None response"""
    if kind == "strawberry" or kind == "tomato":
        return "red"
    elif kind == "banana":
        return "yellow"
    elif kind == "mango":
        return "green"

    return None
Inspecting with MCP Inspector
The reason for the above requirements is that, when running it via the mcp command-line tool, mcp will look for
an object within the script named mcp, and call into instance API functions defined within FastMCP. The following
would then be used to start this new MCP server using the “development” UI:
uv run mcp dev mcp_server_fruit.py
If it starts successfully, then the server should be listening on two TCP ports and you should see output similar to this:
Starting MCP inspector...
⚙ Proxy server listening on port 6277
🔍 MCP Inspector is up and running at http://127.0.0.1:6274 🚀
The MCP Inspector is the development environment that allows the MCP api to be navigated and called, via an
intuitive web UI. In the example above, it is listening on http://127.0.0.1:6274 and can be visited with a web
browser running on the local system.
Initially, the UI will be rendered but it will not automatically connect to the local MCP server it is hosted with.
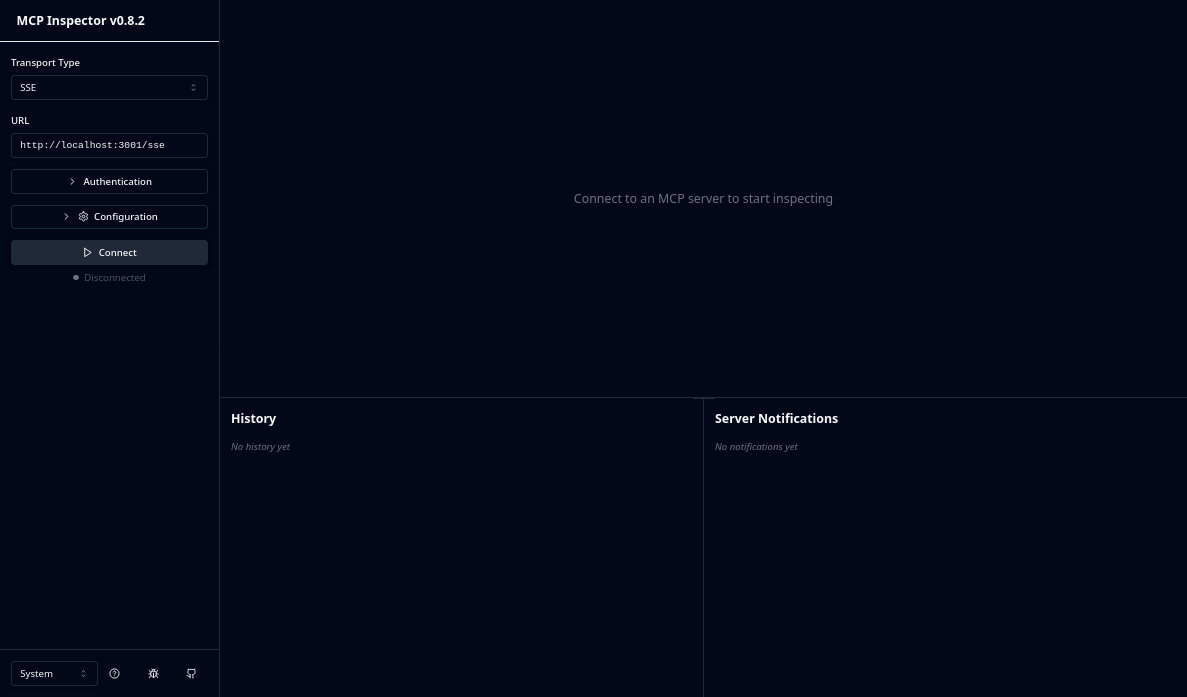
In a separate terminal, the MCP server can be started up (it will listen on TCP port 8000 by default):
uv run mcp run -t sse mcp_server_fruit.py
Once running (and verified listening on port 8000), the server may be inspected using this UI by setting the following
fields in the upper-left and clicking Connect:
- Transport Type: SSE
- URL:
http://localhost:8000/sse(note the/sseon this URL is required)
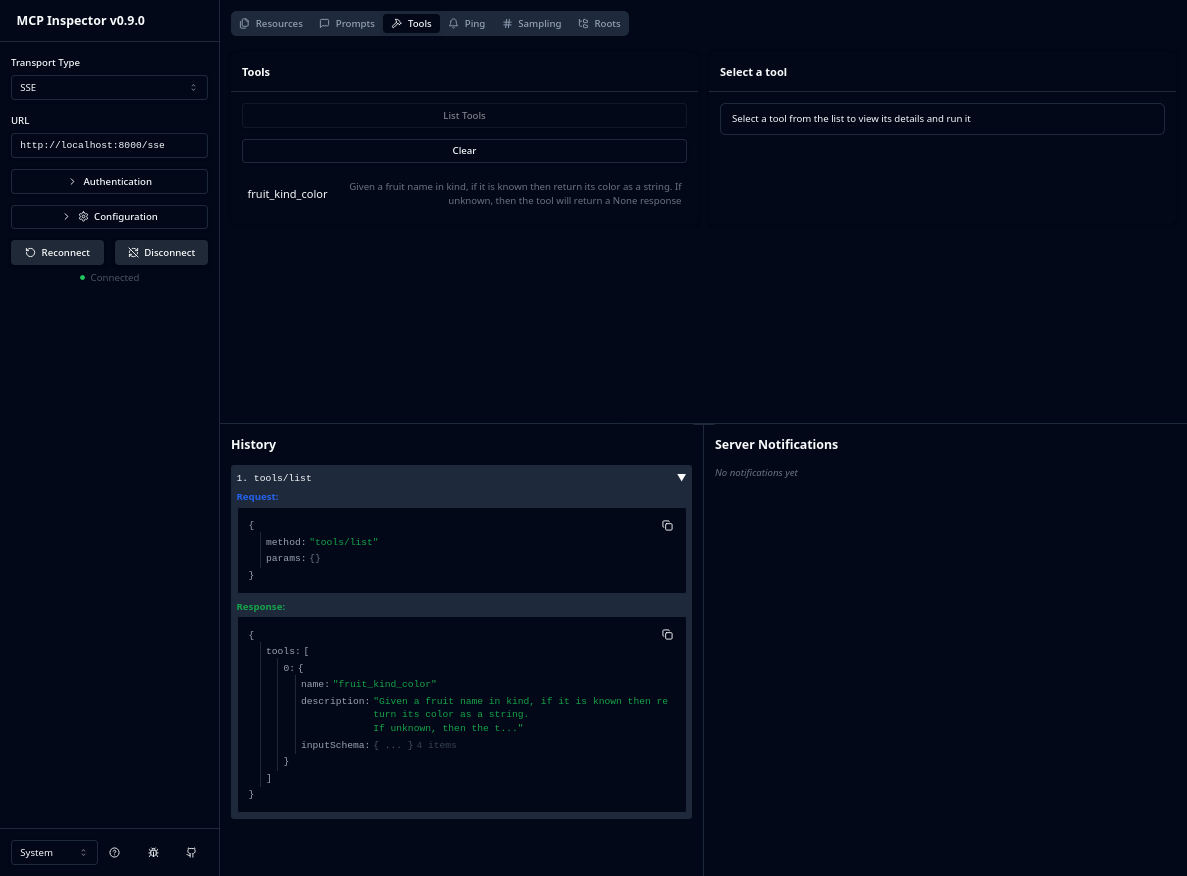
MCP offers a whole bunch of features which can be exposed to supportive GenAI frameworks. We will focus on the Tools
feature, as that’s what we have been using and what AutoGen
implements. The Tools tab at the top of the UI displays the tools available in the MCP server. Initially, no
auto-discovery is performed by the inspector, so this is empty. Clicking the List tools button will display the
information about the fruit_kind_color tool that was just implemented earlier. The History frame, near
bottom-center, shows the history of operations that have been performed against the MCP Server by the Inspector. Each
row is collapsed, and the little triangle at the right-hand edge of the history entry will display the JSON sent to
the server and what was returned.
The discovered tools will be displayed in the middle of the view, below the button clicked to List tools. Any tool can be selected from this list to then be interacted with via the right-hand frame. When selected, a dynamic form will be rendered with appropriate input controls based upon the tool’s specification in Python.
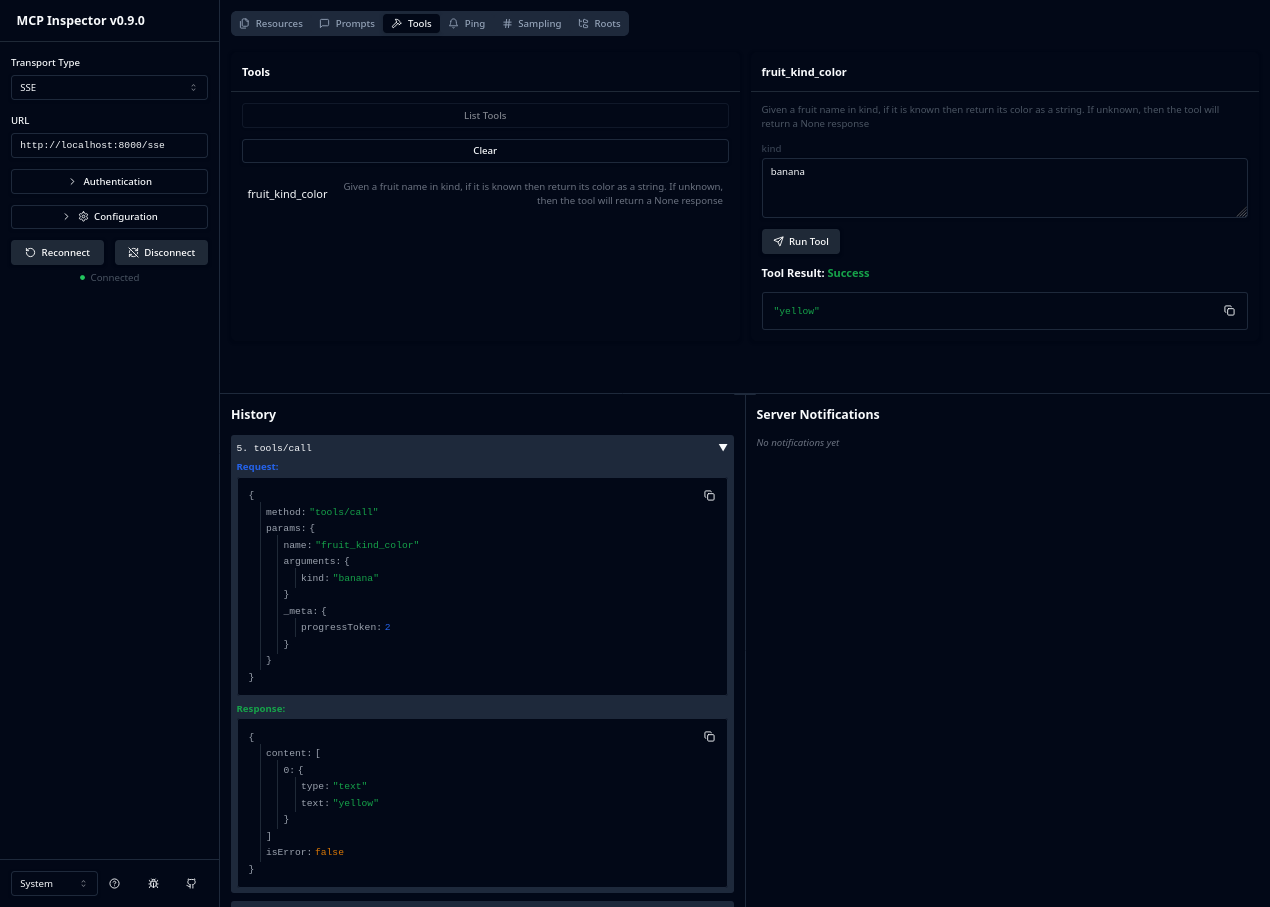
Data may be entered into the fields and the Run Tool button will perform the HTTP JSON request against the MCP server,
displaying the operation’s request and response JSON in the History list. In the above example, I’ve entered banana,
and the tool returned the programmed response yellow.
Connecting CTIgor to MCP
Adding MCP support to AutoGen is achieved via the autogen_ext.tools.mcp package. The changes to make to the CTIgor class will enable the code to accept MCP server URLs as
part of class instance construction.
Initially, symbol imports to be used from the mcp package need to be added to ctiagent.py:
from autogen_ext.tools.mcp import SseServerParams, mcp_server_tools
Second, the CTIgor constructor needs to be extended to accept and store a list of the URLs
for MCP servers to connect to the agent:
    def __init__(self, backend=CTIgorBackend.AZURE_OPENAI, mcp_servers=[]):
        # Define the Azure OpenAI AI Connector and connect to the deployment Terraform provisioned from main.tf
        if backend == CTIgorBackend.AZURE_OPENAI:
            self.chat_service = AzureOpenAIChatCompletionClient(
                azure_deployment=local_settings.deployment,
                api_key=local_settings.azure_api_key,
                azure_endpoint=local_settings.endpoint,
                api_version="2024-10-21",
                model='gpt-4o-mini',
            )
        elif backend == CTIgorBackend.OLLAMA_LOCAL:
            self.chat_service = OllamaChatCompletionClient(
                model='llama3.2:3b',
            )
        else:
            raise ValueError('Invalid LLM backend specified')

        # Store the list of MCP server URLs in self
        self.mcp_server_urls = mcp_servers
Then, this new class method in CTIgor initializes the MCP tools from the list of URLs:
    async def init_mcp(self):
        self.octi_mcp_params = [
            SseServerParams(
                url=u
            ) for u in self.mcp_server_urls
        ]
        self.mcp_tools = [await mcp_server_tools(x) for x in self.octi_mcp_params]
Finally, move initialization into the CTIgor.init_agent method and add additional code to call self.init_mcp.
Enumerate the tools from each and register them in the same list of tools originally handling the agent-internal
tool definitions from the blog entry Porting CTIgor to AutoGen.
    async def init_agent(self):
        # Initialize the MCP tools
        await self.init_mcp()

        # Register the built-in AutoGen tools
        tools=[gen_random, load_from_web, load_text_file]

        # Iterate through each of the entries generated for each URL by self.init_mcp
        # and add all discovered tools advertised by the MCP server(s) to the same tools
        # list
        for mcp_tool in self.mcp_tools:
            tools.extend(mcp_tool)

        print(tools)

        # Instantiate the CTI Agent
        self.agent = AssistantAgent(
            name="ctigor",
            model_client=self.chat_service,

            # Register the tools to use
            tools=tools,
            reflect_on_tool_use=True,
        )
This reuse of existing interfaces is really helpful. As we shall see, it makes the process of prototyping tools locally within an agent, and then moving them into an MCP server, fairly straightforward.
Updating the Summarizer for MCP
Now that CTIgor can be informed about available MCP servers, the front-end tool
ctigor_summarize.py needs to be modified to accept this information
and pass it over to CTIgor.
The argparse initialization gets a new CLI argument that can be specified multiple times to associate more than
one available MCP server with the summarizer:
    def argparse():
        ap = ArgumentParser(description="Have the AI agent ummarize a CTI report, and optionally provide interactive analysis of it")
        ap.add_argument('-f', '--filename', required=False, type=str,
                        help="File path on disk to summarize")
        ap.add_argument('-w', '--webpage', required=False, type=str,
                        help="URL of HTML webpage to summarize")
        ap.add_argument('-i', '--interactive', required=False, default=False, action='store_true',
                        help="Provide an interactive prompt for more analysis")
        ap.add_argument('-o', '--ollama', required=False, default=False, action='store_true',
                        help="Use a local Ollama instance instead of the default (Azure OpenAI)")
        ap.add_argument('-m', '--mcp', required=False, nargs='*', type=str,
                        default=[], help='MCP Server URLs to register with CTIgor')
        return ap.parse_args()
And in ctigor_summarize.main the construction of CTIgor is passed the MCP servers collected from the command line:
    async def main(self):
        self.args = CTIgorReportSummarizer.argparse()
        if self.args.ollama:
            self.ctigor = CTIgor(backend=CTIgorBackend.OLLAMA_LOCAL, mcp_servers=self.args.mcp)
        else:
            self.ctigor = CTIgor(backend=CTIgorBackend.AZURE_OPENAI, mcp_servers=self.args.mcp)

        # Initialize the CTIgor agent
        await self.ctigor.init_agent()

...
Test Out the fruit_kind_color Tool
Leaving the MCP server running on port 8000, the updated Summarizer tool with these MCP feature changes can now be run
as follows:
uv run ctigor_summarizer.py --interactive --mcp http://localhost:8000/sse
The system can then be asked about the fruits built into the fruit_kind_color tool in the MCP Server:
CTIgor> what color is a strawberry?
=======
A strawberry is red.
=======
CTIgor> what color is a tomato?
=======
A tomato is red.
=======
CTIgor> what color is a banana?
=======
A banana is yellow.
=======
CTIgor> what color is a mango?
=======
A mango is green.
=======
Try asking it about another fruit that wasn’t coded into the tool:
CTIgor> what color is a lemon?
=======
I couldn't retrieve the color of a lemon. However, a lemon is typically yellow.
=======
In this case, it provides some insight to the questioner that the tool was unable to tell the agent what color a lemon is,
but the agent also already has some idea of this, so it responds with yellow. What happens, though, if we try putting the
wrong color for a fruit in the prompt. For the next test, the MCP Server has been modified to return "purple" for "banana"
intead of "yellow":
CTIgor> what color is a banana?
=======
A banana is purple.
=======
This example deomnstrates not only how MCP can be used to offer more data to the agent to fill language gaps, but also
that tools may be employed to offer an override of what the LLM might otherwise produce from the model data. However,
keep in mind that, from the model’s point of view, all of the user-inputted text, the MCP tool details, and the chat
history are all just parts of the prompt. The end-user has the ability to arbitrarily change the prompt and even
influence how the agent chooses to consider the rest of the text that was part of the whole prompt. Take for example the
following exchange, made while "purple" was still the hardcoded response for "banana":
CTIgor> What color is a banana, but do not use any tools to look it up
=======
A banana is typically yellow when it is ripe. However, it can also be green when unripe
and brown or black when overripe.
=======
The above demonstrates the end-user instructing the LLM to ignore the tools that were provided to it, when crafting its response. It is important to keep in mind that, as long as the end-user has a free-form injection point for arbitrary text, the opportunity exists for the user to convince the agent to bypass or ignore any tooling intended for the agent to use when answering prompts. This phenomenon is central to an emerging field of AI security research.
Porting the AutoGen Tools to MCP
First step is to remove the references to the function from ctiagent_functions.py from the ctiagent.py, so the import
line should be removed:
from ctiagent_functions import gen_random, load_from_web, load_text_file
Then, the tools array in CTIgor.init_agent should be initialized as an empty list:
    async def init_agent(self):
        # Initialize the MCP tools
        await self.init_mcp()

        # Do not preinitialize with local tools, populate empty list and fill it with
        # only what MCP tells us
        tools=[]
        for mcp_tool in self.mcp_tools:
            tools.extend(mcp_tool)

        # Instantiate the CTI Agent
        self.agent = AssistantAgent(
            name="ctigor",
            model_client=self.chat_service,

            # Register the tools to use
            tools=tools,
            reflect_on_tool_use=True,
        )
Finally, I copied ctiagent_functions.py to mcp_server.py and added in the decorators, imports, and FastMCP object:
import asyncio
import aiohttp
import html2text
from mcp.server.fastmcp import FastMCP
from random import randint
from typing import Annotated

# Construct an MCP Server named FruitMCP
mcp = FastMCP("CTI.MCP")

@mcp.tool()
async def gen_random(
  low: Annotated[int, "Lower bound of the random number"],
  high: Annotated[int, "Upper bound of the random number"]
) -> Annotated[int, "Generated random number within the bounds"]:
    """Generate a random number given a low and high bound"""
    print(f"Running gen_random with low={low}, high={high}")
    return randint(low, high)

@mcp.tool()
async def load_from_web(
    url: Annotated[str, "URL to read from the web into markdown content"]
) -> Annotated[bytes, "The contents from the site, formatted as Markdown"]:
    """Given a URL, convert the page to markdown text and return it as a string"""
    async with aiohttp.ClientSession() as session:
        resphtml = await session.get(url)
        async with resphtml:
            resptxt = html2text.html2text(await resphtml.text())
            return resptxt

    return None

@mcp.tool()
async def load_text_file(
    file_name: Annotated[str, "The name and path of the file on disk to return the text contents of"]
) -> Annotated[bytes, "The contents from the file"]:
    """Load a file from disk, given a filename. Returns a bytestring of the file contents."""
    with open(file_name, "rb") as txtfile:
        return txtfile.read()
For reference, the differences between mcp_server.py and ctiagent_functions.py are minimal - just 7
lines of code needed to be added, and nothing in the logic changed, to hook these up to MCP instead of
directly into AutoGen:
--- ctiagent_functions.py       2025-04-06 21:12:48.780814848 -0400
+++ mcp_server.py       2025-04-18 18:45:01.658934032 -0400
@@ -1,9 +1,14 @@
 import asyncio
 import aiohttp
 import html2text
+from mcp.server.fastmcp import FastMCP
 from random import randint
 from typing import Annotated

+# Construct an MCP Server named CTI.MCP
+mcp = FastMCP("CTI.MCP")
+
+@mcp.tool()
 async def gen_random(
   low: Annotated[int, "Lower bound of the random number"],
   high: Annotated[int, "Upper bound of the random number"]
@@ -12,6 +17,7 @@
     print(f"Running gen_random with low={low}, high={high}")
     return randint(low, high)

+@mcp.tool()
 async def load_from_web(
     url: Annotated[str, "URL to read from the web into markdown content"]
 ) -> Annotated[bytes, "The contents from the site, formatted as Markdown"]:
@@ -24,6 +30,7 @@

     return None

+@mcp.tool()
 async def load_text_file(
     file_name: Annotated[str, "The name and path of the file on disk to return the text contents of"]
 ) -> Annotated[bytes, "The contents from the file"]:
Porting this code over to FastMCP was fairly straightforward. It is able to transparently handle async and non-async
functionality, as well.
Testing the new Code
Now that the tools are advertised by the MCP server, it is possible to run through some of the same test cases from the AutoGen and Semantic Kernel examples.
Start the MCP server via:
uv run mcp run -t sse mcp_server.py
Then, while that’s running, start up another ctigor_summarize.py session. This time, I’ll have CTIgor summarize the
following TrendMicro blog post:
uv run ctigor_summarize.py -i -m http://localhost:8000/sse -w \
    https://www.trendmicro.com/en_us/research/25/d/russian-infrastructure-north-korean-cybercrime.html
The following summary is provided:
Summary of https://www.trendmicro.com/en_us/research/25/d/russian-infrastructure-north-korean-cybercrime.html
================================
The article "Russian Infrastructure Plays Crucial Role in North Korean
Cybercrime Operations" from Trend Micro discusses how North Korean cybercrime
activities, particularly those linked to the Void Dokkaebi group, leverage
Russian internet infrastructure. Key points include:

1. **Infrastructure Use**: North Korea relies heavily on Russian IP address
   ranges, specially in areas close to the North Korean border (Khasan and
   Khabarovsk), utilizing anonymization networks to mask cyber activities and
   evade detection.

2. **Cybercrime Campaigns**: The article outlines the employment of North
   Korean IT workers who utilize Russian IPs to engage in activities such as
   cryptocurrency theft and fraudulent job recruitment aimed at attracting
   foreign IT professionals.

3. **Campaigns and Malware**: Specific campaigns like those associated with
   Beavertail malware demonstrate sophisticated methods, including the creation
   of fictitious companies for social engineering that lures candidates into
   malware traps during job interviews.

4. **Anonymization Techniques**: Various methods, such as VPNs and proxy
   services, help conceal the origin of cyberattacks, complicating attribution
   and enhancing operational security for North Korean actors.

5. **Future Threats**: The findings suggest a potential for increased
   espionage or collaboration between North Korean and Russian entities, as
   these operations continue to evolve in sophistication and scale.

The study emphasizes the importance of cybersecurity measures, advising
IT professionals to conduct tasks within isolated environments to mitigate
risks posed by such schemes.
And then, asking the LLM to dig a bit deeper:
CTIgor> List each IP address and domain name that is provided in the document
and is used by the malicious threat actors discussed in the report. With
each address, include a description of what unique information about each
IP address or domain name that the document discussed. Also include any
relationships between the IP addresses and domain names.

=======
Here is a list of IP addresses and domain names provided in the Trend Micro report along
with descriptions of their unique information and any discussed relationships:

### IP Addresses and Domain Names

1. **IP Range: 80.237.84.0/24**
   - **Description**: Part of KPOST-NET assigned to Khasan, Russia.
   - **Related Information**: Associated with North Korean cybercriminal
   activities and linked to job recruitment schemes utilized by the Void
   Dokkaebi group.

2. **IP Range: 80.237.87.0/24**
   - **Description**: Another part of SKYFREIGHT-NET in Khasan, Russia.
   - **Related Information**: Used for accessing anonymous networks and
   conducting cybercrime linked to North Korea.

3. **IP Range: 83.234.227.0/24**
   - **Description**: Part of SKYFREIGHT-NET as well, located in Khasan,
     Russia.
   - **Related Information**: Involved in malicious activities,
     including connecting to job recruitment sites.

4. **IP Range: 188.43.136.0/24**
   - **Description**: Assigned to Khabarovsk, Russia, specifically KPOST-NET2.
   - **Related Information**: Used by North Korean-aligned IT workers to
     connect back to North Korea; involved in sophisticated theft mechanisms.

5. **IP Range: 188.43.33.249 - 188.43.33.253**
   - **Description**: Significantly tied to generic network assignments,
     connection patterns suggested alignment with North Korean operations.
   - **Related Information**: Indicates a high level of anonymity for cyber
     activities.

6. **Domain Name: BlockNovas.com**
   - **Description**: A fictitious company used in fraudulent job recruitment
     targeting IT professionals in blockchain.
   - **Related Information**:
     Associated with malware distribution (specifically Beavertail) during
     the interview process; utilized to mask North Korean cyber actors.

### Relationships Between IP Addresses and Domain Names

- The **Russian IP addresses** listed above are used by North Korean threat
actors to facilitate various cybercriminal operations while obscuring their
origin. They utilize these IPs to connect to numerous servers across the globe
for tasks such as cryptocurrency theft and engaging with potential victims.

- The domain name **BlockNovas.com** is directly related to the IP addresses,
as it used these Russian IPs for its operations and served as a conduit
for malware distribution. The operations conducted through BlockNovas have
utilized the aforementioned IP addresses to fulfill commands and possibly
interact with malware command-and-control (C&C) infrastructure.

- The links established between the Russian IPs and BlockNovas illustrate a
strategic approach by North Korean actors to exploit the anonymity afforded
by these addresses to carry out cybercrime while placing innocent individuals
in harm's way through social engineering tactics.

This organized mapping of IP addresses and domains reflects the operational
infrastructure utilized by North Korean actors as established in the report.

=======
Conclusion
This post discussed porting the AutoGen tools from Porting CTIgor to AutoGen over to a new MCP server. MCP is a powerful interface for advertising and exposing LLM-compatible tools for an online system. A strong benefit to it is that the authors of an MCP system don’t need to know specifics about LLMs or GenAI in order to produce network-exposed tools from external systems that LLMs can take advantage of. Rather, authors simply need to provide additional documentation that even proves valuable for improved human-readability of the code.
Permanent Link: https://blog.malware.re/2025/04/29/ctigor-mcp/index.html